41. Revolution Slider Responsive Settings (on mobile devices) - Slider Revolution 6
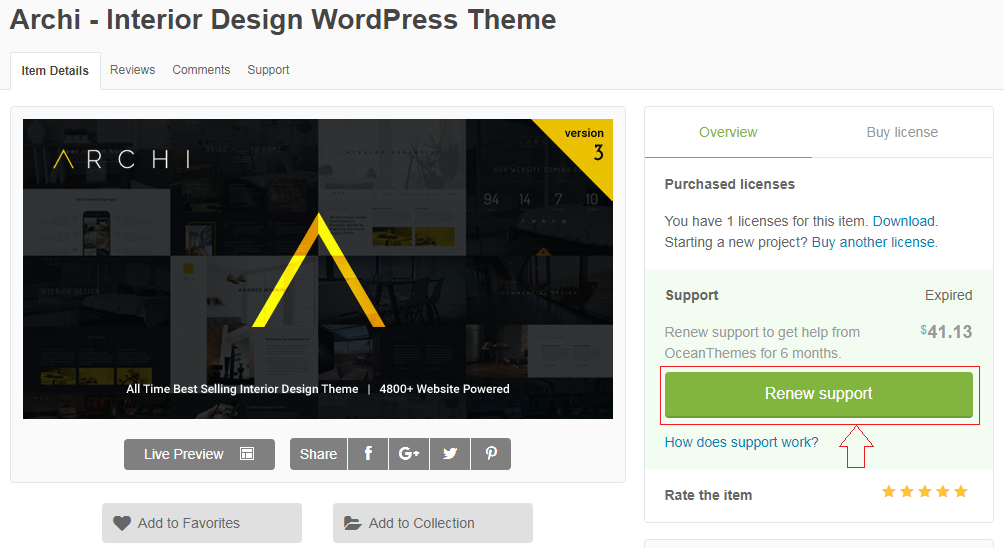
42. Support expired and how to purchase support renewal?
43. Polylang - Activate the languages and translations management for the custom post types and taxonomies.
44. Upload media files with any format?
45. How to change which WordPress page template is set as default template?
46. How to add tabs, menu on left side of service single page?
47. How to add slider text in Archi v3.0+ ?
48. Why Google Map is not working?
49. Troubleshooting the Demo Content Import?
50. When I enable Redux Framework plugin, When I view a page its a blank page. But if i disable it i can see the pages?
51. Option for two different logos style: logo static and logo scroll in Archi 3.1.5
52. How to edit Revolution Slider Demo on Homepage?
53. How to add slider on a page?
54. How to change background image and padding in Section?
55. Missing the menus after import demo content on the Archi theme?
56. Update Archi Theme And Plugins Latest Version?
57. Adding Translation Files To Your Child Theme !
58. How to change another demo?
59. OT Portfolio Masonry setting?
1. Remove slug from custom post type post URLs?
The following code will work, but you just have to keep in mind that conflicts can happen easily if the slug for your custom post type is the same as a page or post's slug...
First, we will remove the slug from the permalink:
Just removing the slug isn't enough. Right now, you'll get a 404 page because WordPress only expects posts and pages to behave this way. You'll also need to add the following:
6. How to Enable WPBakery Page Builder (Formerly Visual Composer) on All Post Types
Hello,
By default, WPBakery Page Builder (Formerly Visual Composer) may not be pre-configured or setup by your theme to allow Visual Composer layout editor to be used on all post types such as Products or Posts, Portfolio, Service, etc.... You can change this using the WPBakery Page Builder (Formerly Visual Composer) Role Manager:
1, Setup WPBakery Page Builder (Formerly Visual Composer) for custom post type : portfolio, service, product, etc...
From your WordPress admin, click WPBakery Page Builder
Click the Role Manager tab
From the Post Types drop-down, choose Custom, then check each of the boxes available and click Save Changes button
2, In your post, page, post type:
3, Edit "portfolio" by Visual Composer and see image guide below:
4, Edit "service" by Visual Composer and see image guide below:
Thank you
7. How to Add Image, Change Image on half Row(Section)?
Hello everyone,
I have some guide for you about add new image or replace by your image on Row (Section).
Note: You need use Archi version 3.1.5.1 or higher
I, Add image or change image in some elements: OT Quick Office, OT Quick Office 2
Just install it (after you already have TinyMCE Advanced, of course) and checkout its code file (under Plugins -> Edit).
All you have to do is add the font definition (name) to the list of fonts in the designated code (located near the end of the main PHP file of this plugin) and add the list item code to another place in the code (a little bit below the first one).
That's it! Now you have the additional font(s) in the dropdown of the font family selection in the editor.
9. Our Process for Mobile and Desktop
Hi,
From Archi version 3.8.2 is added new shortcode "OT Simple Process" element.
1, Our Process for mobile:
Hide on Desktop
2, Our Process for Desktop:
Hide on Mobile
Thank you
10. Loco translate miss some PHP file when create POT file.
2, In Admin page -> Loco Translate -> Themes -> Translate your theme:
3, Create new language (your language):
4, Choose language you want to translate into:
5, Loco Translate plugin will automatically generate your language file and save it in the languages folder in your theme ( wp-content/themes/archi/languages/ ):
6, Translate text in default language (English) in your language:
7, Results after translation:
7a, BackEnd:
7b, FrontEnd (comment box on single post):
You may also be interested, translate the custom post type plugins with Loco Translate plugin:
Thank you
12. Don't save theme options with Redux Framework?
Hello,
Question:
When I do any changes and try to save I am getting an Error “There was a problem with your action. Please try again or reload the page”?
Answer:
Please try update your PHP to version 5.6 and MySQL to version 5.6 on your hosting.
Please contact with your hosting provider to help.
Thank you
13. Fixed 404 Error When Updating, Saving the Posts, Pages, etc...?
1, In your Backend Admin Page -> Archi Options -> Header Settings ->
Thank you
18. How to setup website onepage from a to z?
Hello,
1a, Create a new page is onepage:
1b, Add ID Section to scroll menu to section :
2, Setup Onepage is front page (homepage default):
3, Create a menu for Onepage:
4, Create a Menu for External Pages
Thank you
19. Filter portfolio work?
The OT Portfolio only filters the projects listed in the all projects section. If you want to filters all your projects, you can go to OT Portfolio setting change number show to -1.
20. Infinite next and previous post looping in WordPress?
The PHP Time Limit refers to the amount of time (in seconds) that your site will spend on a single operation before timing out (to avoid server lockups). To prevent the importing process from timing out, the value needs to be increased. 300 (seconds) should be enough for processing the import file.
(Beginner) Ask your hosting company to increase it
The easiest way is to reach out to your hosting company and ask them to increase the max_execution_time to 300.
(Advanced) Increase the Max Execution Time via php.ini
Connect to your server via FTP and find or create the php.ini file. The following line must be added to it:
max_execution_time = 300;
(Advanced) Increase the Max Execution Time via .htaccess
Connect to your server via FTP and find the .htaccess file and add the following line:
php_value max_execution_time 300
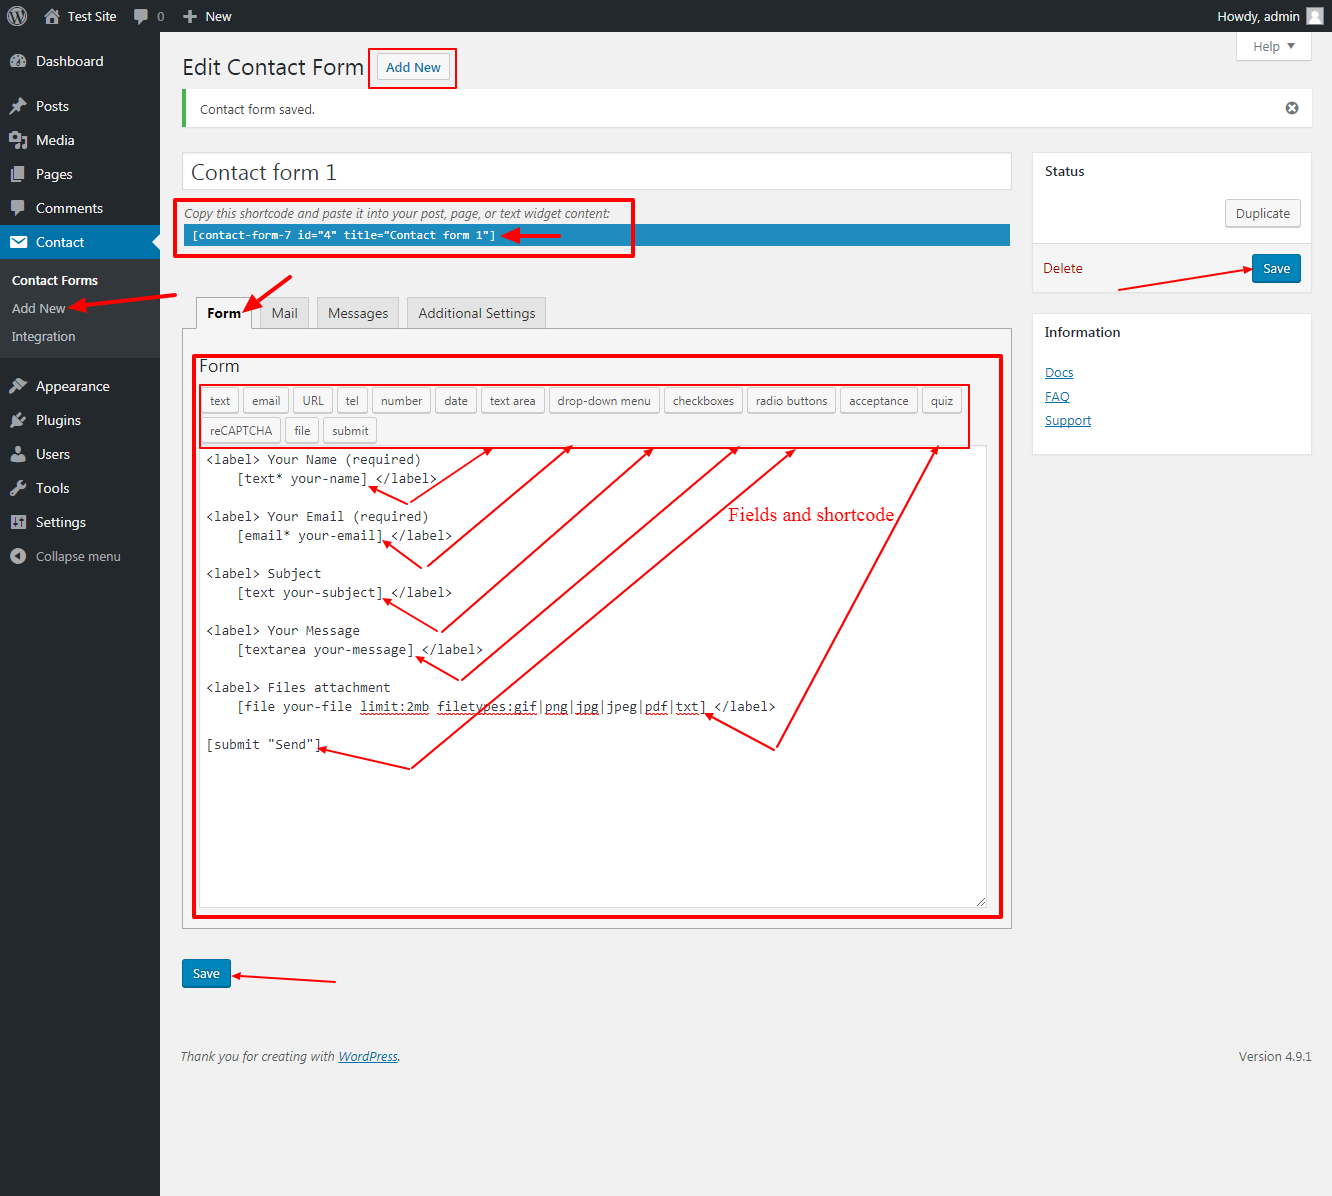
26. How to create a contact form for your website?
Hello,
Now I will guide you to create a contact form for your website, Before creating contact form, I want to make sure that contact form 7 plugin is installed for your website, download and install contact form 7 plugin here: https://wordpress.org/plugins/contact-form-7/
=> Yes, of course. Simply check the “Use mail (2)” box in the Mail tab panel and set up Mail (2) as the template for autoresponder mail. Mail (2) is an additional mail template which works in the same way as the primary Mail template, but Mail (2) is sent only when Mail has been sent successfully.
3, Copy contact form 7 shortcode and paste into your pages, posts:
3a, Copy shortcode:
3b, Paste into your pages, posts:
3c, Result after setup contact form:
Thank you for reading this article, if you need the support from us, please create a ticket.
27. Automatic Update The Plugins
1, When you get notice update the plugins.
2, Deactive all plugins before automatic update.
3, Watch video below for a look.
Thank you
28. How to setup header background colors, text colors, etc...?
Hello,
Here I will show you how to configure color for the header on your website.
First you need go to your Admin panel -> Archi Options -> Header Settings:
* Header Dark:
- Header Static Background Color: #18191b
- Header Scroll Background Color: #18191b
- Header Scroll Border Bottom Color: #333333
- Header Static Text Color: #ffffff
- Header Scroll Text Color: #ffffff
* Header Light:
- Header Static Background Color: #ffffff
- Header Scroll Background Color: #ffffff
- Header Scroll Border Bottom Color: #eeeeee
- Header Static Text Color: #333333
- Header Scroll Text Color: #333333
Do not hesitate to contact us if you need more information.
Regards
29. How to increase logo size, header height in desktop version?
31. Hosting Requirements to running WordPress Theme.
To run WordPress we recommend your host supports:
Please make sure that you are running version WordPress 4.9.x or higher version, version PHP 5.6 or higher version and version MySQL 5.6 or higher version(for legal environments also needing versions PHP 5.6 will work well, but it is recommended to be on at least version PHP 5.7). We have tested it with many OSs such as MAC, Windows and Linux... Below is a list of items you should ensure that your host can comply with them.
Check to ensure that your web host has the minimum requirements to run on WordPress.
Always make sure that they are running with the latest version of WordPress.
You can download the latest release of WordPress from official WordPress website.
Always create and use secure passwords for FTP and Database.
Hosting is more secure when PHP applications, like WordPress which is runing use your account’s username instead of the server’s default shared username (www or www-data). The most common way for hosting companies to do this is use suPHP. Just ask your potential host if they run suPHP or something similar.
Ask for it
Here’s a letter you can send to your hosting provider; copy and paste!
I'm interested in running the open-source WordPress <https: wordpress.org=""></https:> web software and I was wondering if my account supported the following:
PHP 7 or greater
MySQL 5.6 or greater OR MariaDB 10.0 or greater
The mod_rewrite Apache module
Thanks!
Recommended PHP Configuration Limits:
There are many issues you may run into such as white screen, demo content fails when importing, empty page content with Visual Composer and other similar issues are all related to low PHP configuration limits. The solution is given to increase the PHP limits. You can do this on your own, or contact your web hosting and ask them to increase those limits to a minimum need as follows
max_execution_time 300
memory_limit 128M
post_max_size 32M
upload_max_filesize 64M
32. RTL Portfolio - Archi
Hello,
I will guide you to solve this problem, please do follow step by step below :
1, Open file designesia.js (path: archi/js/designesia.js) :
Find line code "filtering gallery" and change by:
        // modify Isotope's absolute position method
        $.Isotope.prototype._positionAbs = function( x, y ) {
          return { right: x, top: y };
        };
        // --------------------------------------------------
        // filtering gallery
        // --------------------------------------------------
        var $container = jQuery('#testimonial-masonry');
            $container.isotope({
                itemSelector: '.item',
        });
        var $container = jQuery('#services-masonry');
            $container.isotope({
                itemSelector: '.item',
        });
        jQuery('.archi-image-gallery').isotope({
            itemSelector: '.item',
        });
        var $container = jQuery('#gallery');
            $container.isotope({
                transformsEnabled: false,
                itemSelector: '.item',
                filter: '*'
        });
        jQuery('#filters a').on("click", function() {
            var $this = jQuery(this);
            if ( $this.hasClass('selected') ) {
                return false;
                }
            var $optionSet = $this.parents();
            $optionSet.find('.selected').removeClass('selected');
            $this.addClass('selected');

            var selector = jQuery(this).attr('data-filter');
            $container.isotope({
                filter: selector
            });
            return false;
        });
33. Missing Top Page (Sub Header) on Frontend after update the new version 4.1.0?
Hi everyone,
From Archi Version: 4.1.0, we have change settings Top Page (Sub Header) for Post, Page, Service, Portfolio page, etc...
If you missing the top page(sub header) after updating Archi version 4.1.0, you need to go to backend edit each Post, Page, Service page, Portfolio page, each article to turn on Top Page and save changes.
Best Regards,
OceanThemes
34. How to use Portfolio, Gallery elements in Archi Theme?
Hi Everyone,
Each client has different requirements for their website and how to present their projects on the site, So we have created different elements to meet all those requirements.
Let me know how you would like to present your project and I will show you how to use the appropriate elements for your site.
1, OT Image Gallery 1, OT Image Gallery 2 (Archi 3.0.0) -> Use for you to show all images in Gallery.
3, Click on button "Renew support" to buy a extended support for your WordPress Theme.
4, Complete your payment.
Thank you for purchasing the extended support package and after the purchase, you can continue to request support from us on this support system.
43. Polylang - Activate the languages and translations management for the custom post types and taxonomies.
Hi everyone,
1, In Admin page -> Languages -> Settings -> Custom post types and Taxonomies -> Settings:
2, Choose custom post types and taxonomies:
3, Start translations for the custom post types and taxonomies:
Thank you
44. Upload media files with any format?
For upload video files with other format and not support from your WordPress site, you need allow video format you want to upload on your WordPress site:
Add this code below into your functions.php file (path: wp-content/themes/theme-name/functions.php)
function archi_default_page_template() {
    global $post;
    if ( 'page' == $post->post_type
        && 0 != count( get_page_templates( $post ) )
        && get_option( 'page_for_posts' ) != $post->ID // Not the page for listing posts
        && '' == $post->page_template // Only when page_template is not set
    ) {
        $post->page_template = "page-templates/template-fullwidth.php";
    }
}
add_action('add_meta_boxes', 'archi_default_page_template', 1);
46. How to add tabs, menu on left side of service single page?
Hello,
in latest version of Archi theme, we have change option menu for service page, you easy change menu and order menu, tabs on service page.
1, Create a new menu for service page by go to Appearance -> Menus -> Select Service Post -> Add to Menu:
2, Check menu or tabs is show on frontend service page now:
3, You can also select the display location for the sidebar on the single service page, In your Archi Options -> Service Settings -> Service Single:
Thank you
47. How to add slider text in Archi v3.0+ ?
Hi everyone !
From Archi version 3.0 or heigher, we will not use slider text plugin to add slider text in Elements " OT Home ...* "
Add unlimited slider text for elements : OT Home HTML5 Video, OT Home Parallax, OT Home Parallax 2, OT Home Youtube Video, OT Home Moving Background
How to add slider text in OT Home Parallax or other OT Home ... ? please watch video guide below :
Thank you
48. Why Google Map is not working?
Hi,
This is a surprise from the policy change using the Google Map API platform from Google, So customers will not be able to use the old Google Map API key that comes with the archi theme.
Customers will need to create their own Google Map API key for their website.
Add your Google Map API key in backend of your website by go to backend WP admin -> Archi Options -> Miscellaneous Settings -> http://prntscr.com/k9s56n
Thank you
49. Troubleshooting the Demo Content Import?
Hi All,
I've heard from a couple of users having issues during the demo-content import process and I wanted to help out by providing some usable information and steps that you can follow.
Note: This does fall beyond our scope of support, though, so if you are still having issues after this article - please touch base with your hosting service since they are going to be the experts of your setup/server conditions. If they provide some feedback for the theme, please let me know.
Most of the time, this is a simple WordPress or setup limitation and there are a couple things that you can do to troubleshoot this process.
Here are some variables to consider when troubleshooting this:
User role that is submitting the upload
Server limitations (ie. php memory, file upload size, etc.)
Access/setup of .htaccess, php.ini, and/or wp-config.php (ie. do what do you have access to and what are the current settings in regards to file size, uploads, and memory.
Check your PHP version and other WP specific requirements:
You might also consider a plugin like "WordPress phpinfo{}" to view your configuration details.
Fixing/Increasing WordPress/Server Limitations
01 - Touch base with hosting: Different servers/hosting services place standard limitations on WordPress setups/users. These are normal and easily increased by either touching base with you're hosting service, or by doing it manually. If you do want to touch base with you're hosting service, they should also be able to provide you with an error log and provide some additional insight as to why this is occurring for you.
02 - Fixing/Increasing Limitations: From there, the manual option is pretty easy, but can be intimidating if you're not familiar with the workflow.
wp-config.php - The most likely fix is to add this to your wp-config.php file:
But usually the culprit is limited to one of these options.
The WordPress Importer
There are many of us out there that wish that there was a better import method/plugin than the WordPress Importer because of the various bugs that it has at the time of posting this. With that said, it does do the job eventually and is the best alternative out there right now.
01 - Error Log: If you are seeing a list of errors provided after the import, this is totally normal. There are various reasons for each of these "failed to import" messages, but nothing that would indicate a major error. Most of the time, this is just because the content already exists.
In another example, if a plugin isn't active (that the content being imported uses) it will also display an "error" message - since the content can't be added to a deactivated/uninstalled plugin. - ie. Contact Form 7 plugin has content demo imported at this stage.
Also, if the first import doesn't import everything, then during the next import - all duplicate items would display the "failed to import".
02 - Duplicates: Simply put, uploading the xml file even 10 times won't hurt anything. You can't upload duplicate posts, pages, images, etc. (you'll see an error message for each when importing the xml if they already exist).
That said, duplicates menus will be added in Appearance > Menus, but that's easy to fix > Just delete all entire menus, and do one last import. Menus, as of this post, are the only items that are duplicated during multiple imports.
50. When I enable Redux Framework plugin, When I view a page its a blank page. But if i disable it i can see the pages?
Please try go to Archi Options => save again. Then visit site.
Thank you.
51. Option for two different logos style: logo static and logo scroll in Archi 3.1.5
Hi everyone!
In Archi new version 3.1.5, we have add more option for logo and so you can add two different logos style for your header, one for header static with background overlay or transparent and one for header when scroll down page with background dark or light :
That help your website very much.
Thank you
52. How to edit Revolution Slider Demo on Homepage?
Hello,
Please note: Please make sure you have fully imported the demo data for your website.
1, Go to your WP Admin page -> Slider Revolution -> Click Edit Slider:
2, Click on slide image and replace demo content by your content:
3, Edit each field:
4, After Edit all fields and save change fields finish -> You need to Save Slide:
Thank you!
53. How to add slider on a page?
Hello,
1, You need make sure, your slider is ready (you can create new slider or import slider demo include in theme package) , In backend wp admin -> Slider Revolution -> Create new or Import Slider:
2, In backend Edit page, you need click on button plus to add revolution slider element:
3, Chooise Slider you want use and Click on button Add Selected Slider
4, Save Change for page
5, Check your result on front-end page
Thank you
54. How to change background image and padding in Section?
Hello,
1, In your backend edit page, post, etc...
2, Find section you want change background image and padding top, padding bottom for section.
3, Click Edit Row :
4, Change Background Image and Padding for Row (Section) :
5, Save all change for Page :
Thank you
55. Missing the menus after import demo content on the Archi theme?
Hello,
Video tutorial on how to fix the missing menu problem after importing demo data:
Thank you
56. Update Archi Theme And Plugins Latest Version?
Hi everyone,
Note: Remember to clear all caches when updating so that the code from the latest release is always in use. This will help you to avoid any potential errors.
*I, Note before update Archi theme:
1, You need Save old theme and place on your computer, use for backup some files or some custom code if needed.
2, Download again theme package on https://themeforest.net/downloads and chooise Download "All Files & documentation" and unzip theme package to a folder.
*II, Start update theme, please watch video guide below :
Way 1, Update new plugins from online sources : Appearance -> Install Plugins -> Install and Active : WPBakery Visual Composer and Revolution Slider
Way 2, Update new plugins from theme package download again on https://themeforest.net/downloads "All files & documentation" and unzip to a folder and find folder "plugins" and find plugins zip files.
Thank you for reading and watching.
57. Adding Translation Files To Your Child Theme !
If you worked hard to translate the theme you probably don’t want to keep the translated .po and .mo files in the parent theme because they will be overwritten when you update the theme. The best solution would be to place them in your child theme which is very easy to do and is also explained right in the WordPress CODEX.
So basically you just have to add your languages into your child theme and then use (add to your child theme’s functions.php) the following function to load it from the child theme instead of the parent:
// Load translation files from your child theme instead of the parent theme
function my_child_theme_locale() {
    load_child_theme_textdomain( 'total', get_stylesheet_directory() . '/languages' );
}
add_action( 'after_setup_theme', 'my_child_theme_locale' );
Then add your translated files inside a "languages" folder in the child theme.
58. How to change another demo?
Hi,
* How to change another demo and delete the existing demo version on the site?